If you’re a content creator who records videos using multiple cameras, or you’re a podcast video host, I believe you should learn how to edit podcast videos. It’s a valuable skill that can save you time, improve your content quality, and give you complete creative control over your videos.
But this isn’t just for content creators.
If you’re a freelancer who wants to earn money by editing videos from home or from anywhere in the world, then learning podcast editing is one of the best skills you can invest in. The number of podcast creators is growing every day, and almost all of them need a skilled video editor.
If you have a decent laptop or computer and can work for just 3–4 hours a day, you can earn close to ₹10,000 per podcast episode, just like I do. And that’s only the kind of payment you can expect from beginner or smaller podcast creators.
If you start working with larger creators, established brands, or international clients, you can earn four to five times more for a single episode.
The best part is that you don’t need a huge investment to get started. All you need is a computer, an electricity connection, an Adobe Creative Cloud subscription (around ₹1,200 per month), and 4–5 days to edit one episode.
That’s it.
Podcast video editing is a high-demand skill that can help you build a profitable freelance career while working from the comfort of your home.
How I Learned Podcast Video Editing
If you’ve already read my previous two PDFs, you probably know that I started my journey as a freelance video editor in January 2026. Before that, I was a blogger, and this website (TechSuvam) was my very first blog.
One thing I’ve always been proud of is that I never paid to learn blogging or video editing. Everything I know today, I learned for free from YouTube, and I continue learning from YouTube.
When I started learning video editing, I practised every single day. I believed that one day I would be good enough to edit videos for clients. Slowly, I started creating content on Instagram, and eventually, clients began reaching out to me.
To be honest, podcast editing is much easier than many other types of video editing, but learning the workflow can be challenging in the beginning. Since I had only edited my own videos and short-form content for clients, I had never edited a full podcast before.
Then one day, a client contacted me through Instagram looking for a podcast video editor.
Without overthinking it, I said, “Yes, I can do it.”
We agreed on ₹5,000 per episode.
The problem was… I had never edited a podcast before.
So I went back to YouTube and learned everything I could about podcast editing. But that’s when the real challenge began.
A typical one-hour podcast can easily have 50GB or more of raw footage, especially when multiple cameras are involved. That means you need enough storage space and a computer powerful enough to handle large projects smoothly.
My first podcast editing project took me almost 4–5 days to complete. There was no colour grading, no cinematic effects, and no trailer editing. I simply focused on cutting mistakes, trimming unnecessary parts, and syncing the footage.
When I finally sent the video to the client for review, I realised how much I still had to learn.
The client pointed out countless mistakes. I tried fixing them, but I couldn’t even identify many of my own errors. More importantly, I wasn’t able to meet the client’s expectations.
After working on that project for nearly 10 days, I lost the client.
It was disappointing.
But I didn’t quit.
In fact, podcast editing had become my favourite type of editing. Instead of giving up, I decided to understand the craft more deeply and keep improving every single day.
The only problem was practice.
To become better, I needed real projects.
So I started applying for every podcast editing opportunity I could find on Instagram and LinkedIn. I didn’t care how much the client was paying. My goal wasn’t money, it was experience.
Fortunately, one day, a content creator from Canada sent me a message. Initially, he only needed someone to edit short-form clips from his podcast because he already had a full-time podcast editor. However, that editor didn’t create trailers, and since I already had experience with caption-based editing and short-form videos, I was confident I could help.
I asked him to give me one opportunity to edit an entire podcast episode.
Thankfully, he said yes.
That creator became my first long-term podcast editing client.
Since then, I’ve edited more than six podcast episodes for him, and we still work together today.
At the time of writing this, I work with two podcast hosts, and both of them are happy with my work.
Even now, I don’t consider myself a perfect editor. I still try to learn something new every day because I believe that the moment you stop learning is the moment you stop growing.
Best Editing Software For Podcasts
There are plenty of video editing software options available today. Most people prefer software that works on mobile phones because it’s convenient and easy to use. However, podcast video editing is not something you can realistically do on a mobile device.
Think about it.
A typical one-hour podcast can generate 50–60 GB of raw footage. Once you add B-rolls, graphics, music, sound effects, and other assets, the final exported video can easily be 10 GB or even larger.
Handling files of that size requires a powerful computer with sufficient storage and RAM. That’s why podcast editing isn’t practical on a smartphone or even on a low-performance laptop or PC.
The good news is that podcast editing is one of the higher-paying niches in video editing. But just like the income potential is higher, the initial investment also needs to be a bit higher.
Now the question is:
Which software should you use for podcast video editing?
Personally, I use Adobe Premiere Pro and Final Cut Pro. I haven’t used DaVinci Resolve, so I can’t give an honest opinion about it.
Between Premiere Pro and Final Cut Pro, I personally prefer Adobe Premiere Pro.
Why?
Because it offers more advanced features, better flexibility for professional workflows, excellent colour correction tools, and most importantly, it’s much easier to share project files with clients or other editors when collaboration is required.
These features make Premiere Pro a better choice for professional podcast editing, especially if you’re planning to work with clients regularly.
Final Cut Pro and DaVinci Resolve are indeed available with one-time purchases (or, in DaVinci Resolve’s case, a powerful free version plus a paid Studio version), whereas Adobe Creative Cloud requires a monthly subscription.
Even so, I still recommend Adobe Premiere Pro because it fits my workflow the best.
After all, if you’re investing around ₹1,200 per month in software but using it to earn ₹50,000 or more, that’s not an expense; it’s an investment in your career.
How To Edit a Podcast in Premiere Pro
Podcast video editing involves several important steps, and in this article, I’ll try to explain each one of them.
Before we begin, keep one thing in mind: editing a professional podcast episode takes time. In most cases, you should expect to spend at least 2–3 days on a single episode.
Why?
Because you’ll need to watch the entire podcast multiple times, your first pass should focus on understanding the conversation and identifying mistakes. The second is for making precise cuts, improving the pacing, syncing multiple camera angles, enhancing the audio, and applying colour correction. Finally, you’ll need to export the project and perform a final quality check.
But your work doesn’t end there.
Most podcast creators also need a high-quality trailer to promote the episode on social media. While you may be able to edit the full one-hour episode in a single day, creating an engaging 60-second trailer can easily take another day or two.
A great podcast trailer isn’t just a collection of random clips. It requires careful storytelling, the right B-roll footage, background music, sound effects, animated captions, and strong pacing to capture the audience’s attention within the first few seconds.
That’s why podcast editing isn’t just about cutting videos; it’s about creating content that keeps viewers engaged from start to finish.
Here is the step-by-step process to edit a Podcast-
1. Download Raw Clips
The first step in editing a podcast for a client is to make sure your device has enough free storage. Keep at least 100 GB of free space available. Otherwise, you may face problems later while downloading the files and editing the video.
After that, download all the files one by one from the Google Drive link or any other file-sharing link provided by the client.
2. Upload in Adobe Premiere Pro
After downloading all the video and audio files, import them into Adobe Premiere Pro and create a new sequence. In many cases, Premiere Pro will automatically create a sequence as soon as you drag a video file onto the timeline.
Check whether the sequence has been created in 4K or 1080p. Then, change the sequence settings according to your preference.
For a long podcast, I usually use a 1920 × 1080, 30 fps sequence.
After that, select all the video clips, right-click, and choose the Fit to Frame option.
3. Synchronise Videos
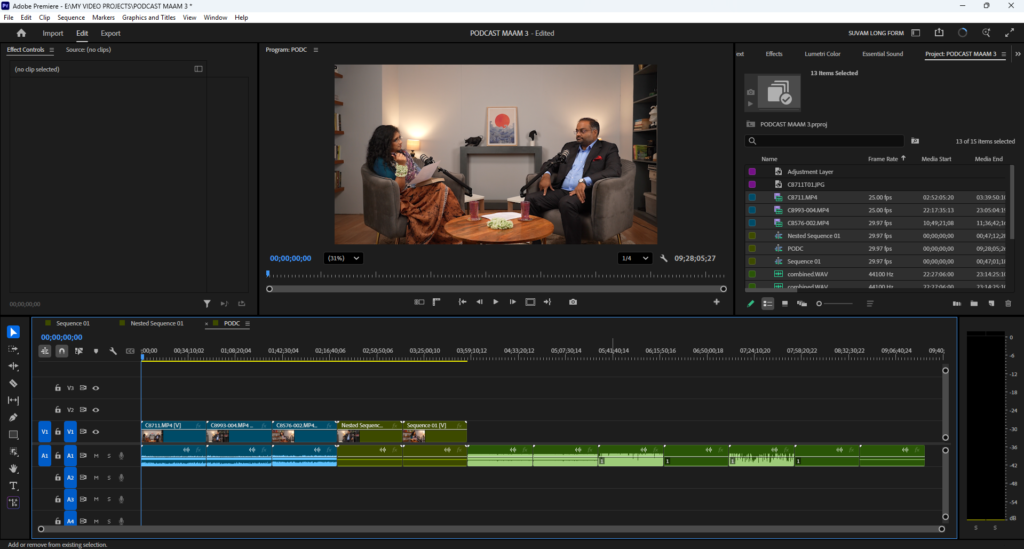
Once you’ve set all the videos to the same frame size, separate all the video and audio clips and place them on different layers with some space between them. Make sure that no two clips are on the same layer. Each layer should contain only one clip.
Next, select all the clips, right-click, and choose the Synchronise option. After waiting for a few moments, Premiere Pro will automatically synchronise all the audio and video files.
If you get any errors, try syncing the clip that failed separately. If it still doesn’t sync, select that audio clip, press G to open the Audio Gain settings, increase the gain slightly, and try synchronising it again.
Once all the files have been synchronised, trim everything before the actual podcast starts. Delete the camera audio tracks and remove any unnecessary footage at the end of the videos. Keep only the professional microphone audio and the video clips on the timeline.
Typically, there are three camera angles: Host, Guest, and Master, along with three audio tracks: Host, Guest, and Combined. Make sure everything is organised correctly before moving on to the editing process.
4. Nest Videos and Enable Multi-Camera
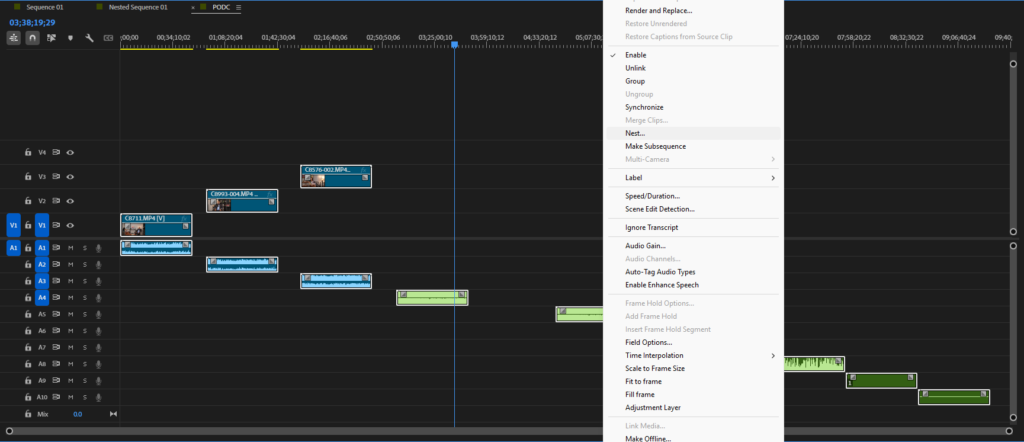
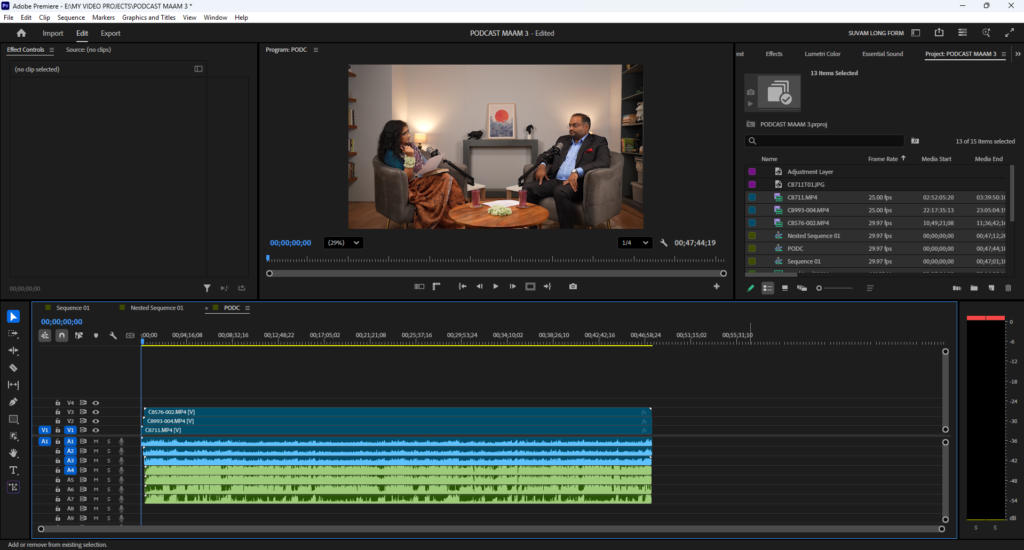
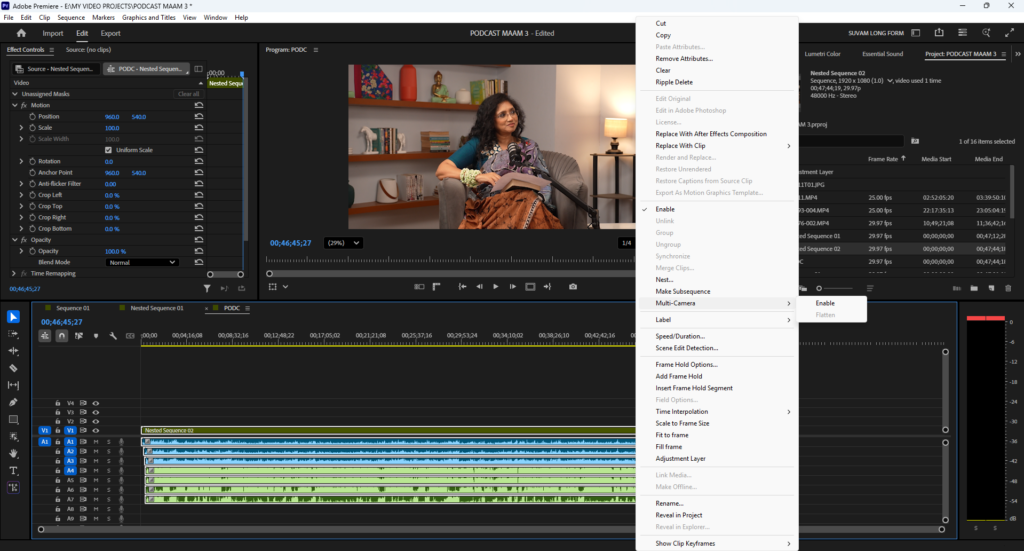
After synchronising all the clips, select them all together, right-click, and choose Nest. Then, right-click on the nested clip and enable Multi-Camera from the Multi-Camera option.
Keep in mind that only the video clips should be nested, not the audio.
5. Watch Videos and Cut Clips
By this point, your podcast is ready from start to finish, and you should have a clear idea of how long the final video will be. But the work doesn’t end here. This is where the actual editing begins.
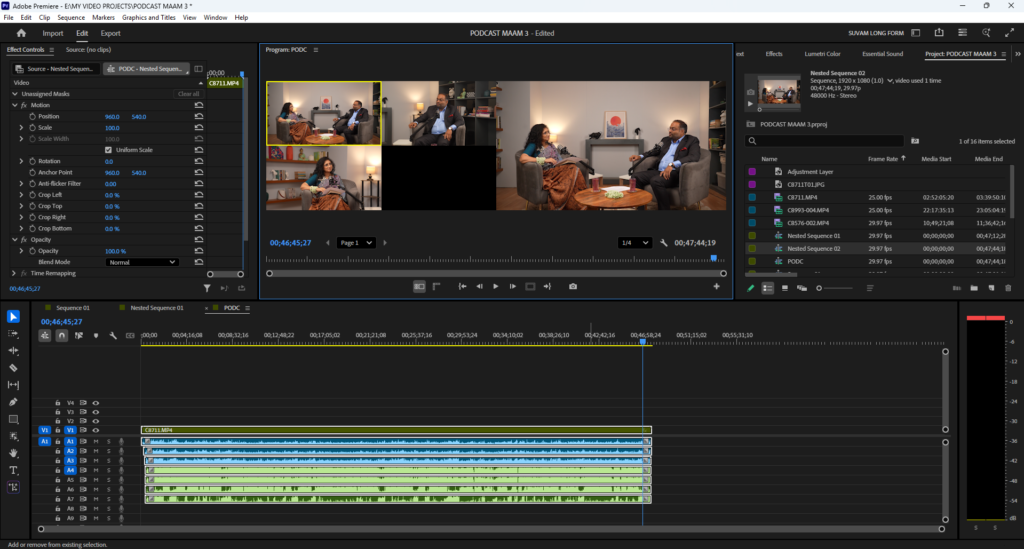
Once Multi-Camera is enabled, you’ll see all three camera angles. Now, listen to the audio carefully and switch to the camera angle that best matches each moment. Make cuts accordingly throughout the podcast.
If any long pauses or sections should be removed, trim them carefully. In some cases, you may also need to use split-screen editing by placing the host and guest on opposite sides of the frame.
6. Add Adjustment Layer & Colour Grading
The next step is colour grading the video.
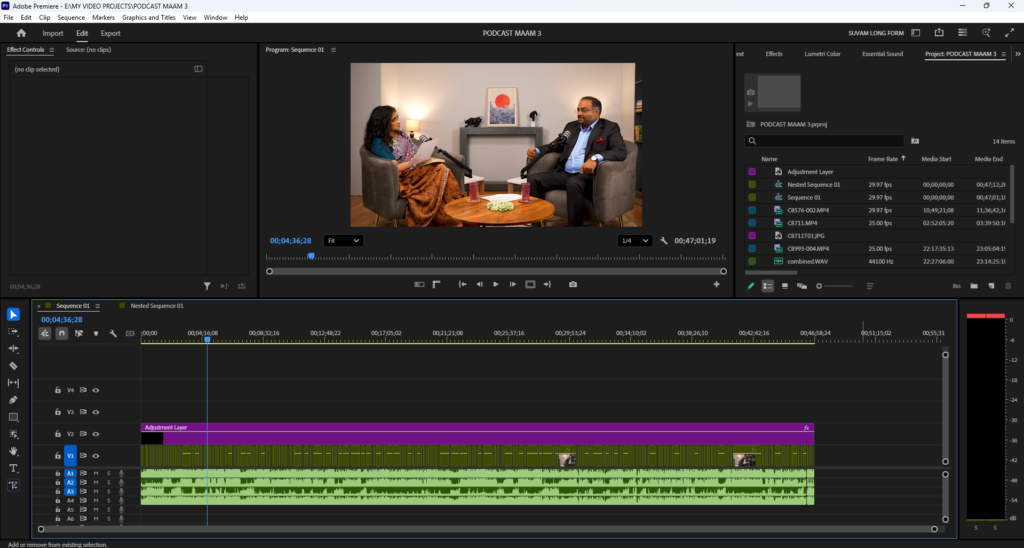
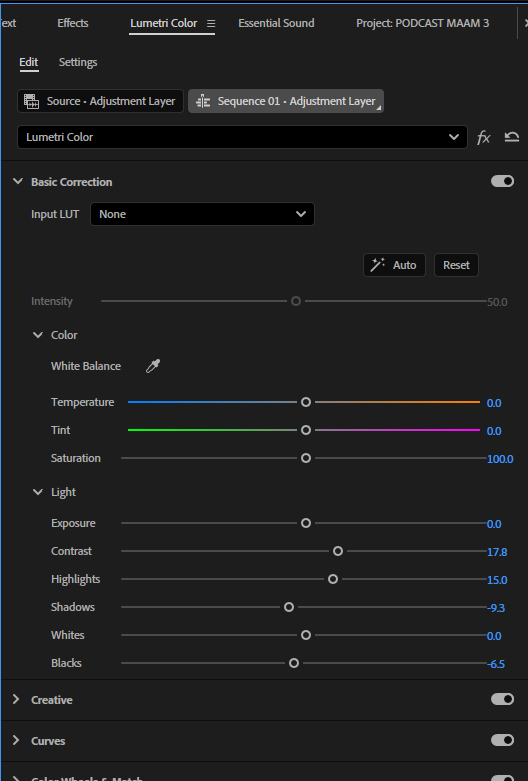
You can either colour grade each clip individually or use an Adjustment Layer and apply the colour grading to the entire timeline. Simply go to the Lumetri Colour panel and use tools like Basic Correction, Creative, Curves, Colour Wheels, and HSL Secondary to achieve the desired look.
Personally, I don’t do heavy colour grading for my clients’ podcasts. Since podcasts are meant to look natural, I usually stick to Basic Correction along with a few adjustments in the Creative section. This gives the footage a clean and professional look without making it feel over-processed.
7. Audio Editing
The next step is podcast audio editing.
Most professional podcasts are recorded in studios, so the audio is usually clean and well-balanced. However, if you listen carefully, you’ll often notice a small amount of background noise. On top of that, many creators don’t record in professional studios. They shoot online podcasts or interviews at home, where the audio quality usually needs improvement.
That’s why learning basic audio editing is an important skill for every podcast editor.
My workflow is simple.
First, export the podcast audio and import it into Audacity. Perform the basic cleanup there, then export the improved audio and replace the original audio in your Premiere Pro timeline.
After that, apply these three audio effects in Premiere Pro:
- Denoise – Use a low Noise Reduction setting.
- Parametric Equaliser – Apply the Voice Enhancer preset.
- Mastering – Choose the Subtle Clarity preset.
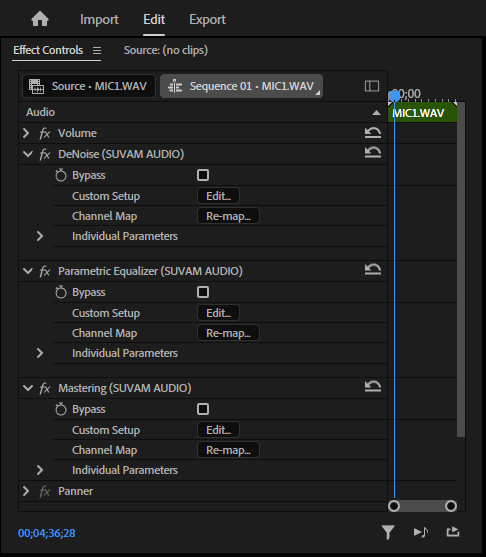
These three effects are usually enough to make the audio sound much cleaner and more professional.
If you want a faster one-click solution, you can simply select the audio, open the Essential Sound panel, choose Podcast Voice, enable Enhance Speech, and set the amount between 0.7 and 1.1.
While this method is quick, I don’t use it very often. In many cases, it makes the voice sound robotic, and sometimes the audio becomes inconsistent throughout the episode.
That’s why I prefer the first method. It takes a little more time, but the results sound much more natural and professional.
8. Edit Podcast Trailer
The next step is creating the podcast trailer.
Go through the entire podcast video and pick the best questions, the most valuable answers, and the most interesting moments. Then, place those clips into a separate sequence and try to create a 1-minute trailer.
In many cases, your client will tell you which part they want to use for the trailer. If not, you’ll have to create one on your own.
If you’re unsure how to make an engaging trailer, watch trailers from popular creators and study them carefully. Try to understand what they’ve done to make viewers interested enough to watch the full podcast video.
To make your trailer more engaging, add text animations, B-rolls, background music, sound effects, transitions, and other motion graphics wherever necessary.
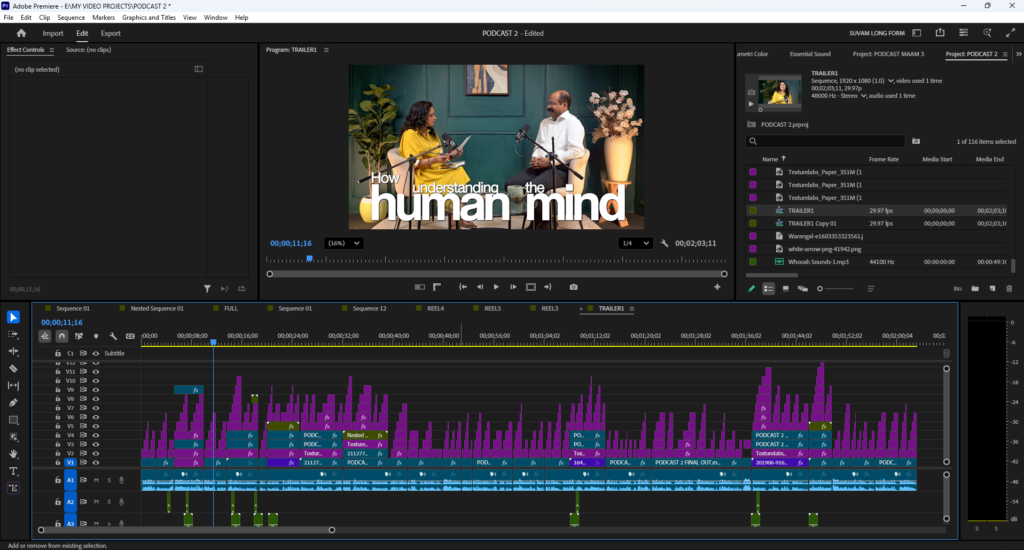
Always remember that the purpose of a trailer is not to summarise the entire podcast. Its purpose is to hook the audience, create curiosity, and make them want to watch the complete episode.
Although editing the full podcast takes me around one day, creating the trailer alone usually takes another two days. That’s why trailer editing is a separate topic in itself.
To explain it briefly, start by downloading relevant B-rolls, background music, and sound effects from copyright-free or royalty-free sources.
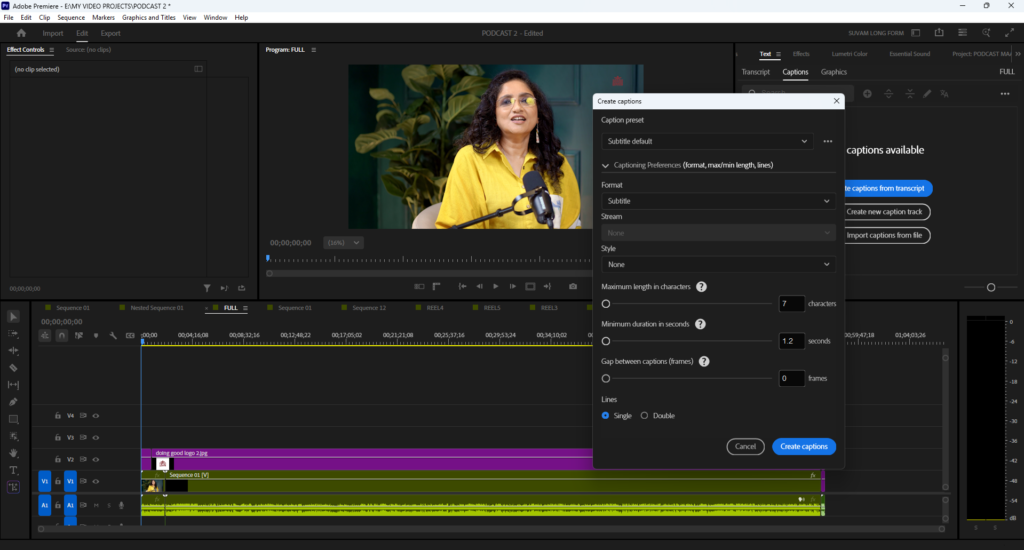
For captions, go to the Text panel in Premiere Pro and generate automatic captions. Then, customise them by adjusting the font, font size, spacing, shadow, colour, and other properties to match your editing style.
Once you’re happy with the look, convert the captions into a Graphics layer. After that, use the Position, Scale, and other transform properties to place and animate them wherever required.
With the right combination of captions, B-rolls, music, sound effects, and smooth animations, you can create a trailer that captures the audience’s attention and encourages them to watch the full podcast.
9. Add Outro and Logo
Finally, it’s time to finish the video.
Add your client’s channel logo on the topmost layer of the timeline. If the logo has a background, remove it if necessary, then adjust its size and position so it looks clean and professional. Make sure the logo remains visible throughout the entire podcast, from beginning to end.
Also, if your client has a custom outro, end screen, or outro music, add it at the end of the video. This gives the podcast a polished and professional finish while maintaining the client’s branding.
10. Export Final Podcast
Finally, export the video in 1920 × 1080, 30 fps and send it to the client for review. If the client requests any revisions, make those corrections. Once the final podcast is approved, you can begin working on the trailer.
Final Thoughts: Podcast Video Editing
In this article, I shared my complete podcast editing workflow. Of course, every editor has a different style, but this is the process I personally follow.
Nowadays, podcasts are everywhere. Some creators record at home, some conduct online interviews, and many shoot in professional studios. The demand for podcast editors is growing every day.
If you work with a beginner creator, you can easily charge at least ₹5,000 per episode. And if you get the opportunity to work with an established creator whose business grows because of your editing, you can charge four to five times more for a single episode.
All you need to get started is a good laptop, a stable internet connection, and solid video editing skills. With these three things, it’s completely possible to earn anywhere between ₹30,000 and ₹1–2 lakh per month from podcast editing.
The best part is that you don’t need dozens of clients. You only need two good clients who publish at least 3–4 podcast episodes every month.
Also, remember that most creators who hire you to edit their podcasts will also need shorts and reels from the same episode. That means your earnings per project can increase significantly. Even with beginner creators, it’s possible to earn up to ₹10,000 per episode when the work includes one full podcast along with multiple reels.
For example, if editing one podcast and five reels takes you around seven days, you can comfortably complete four such projects in a month and earn at least ₹40,000. With just two consistent clients, earning ₹60,000 or more per month from home becomes a realistic goal. And if those clients are established creators, your income can be much higher.
If you’re still doubtful after reading this article, there’s probably nothing more I can say. The only way to truly understand the opportunity is to start learning, practice consistently, and work with your first client.
Finally, if you’d like to learn more about video editing, freelancing, personal branding, and my journey, don’t forget to follow me on YouTube, Instagram, and LinkedIn.
Thank you for reading.
